Before going any further:
The best detail is the one created in revit using Detail components and repeating details, revit text, leaders, etc. It is always better to ‘link’ the CAD detail and draw over this CAD detail to create a full blown revit detail and then unlink the CAD detail. If you cannot do this for some reason, think again. If you still cannot do this, then:
• To do in CAD:
- • You can skip the CAD part if you are going to fully explode the detail in Revit.
- • Run ‘REVIT’ command (this custom command created using LISP, changes our standard DIM style; TEXT style, etc to be revit friendly. It tries to remove stacked text to regular text in DIMs, etc.)
- • Delete unnecessary stuff. Purge.
- • Bring objects closer to 0,0,0
- • Set scale (this custom command created using LISP, sets DIMSCALE; LTSCALE; etc.)
- • Use the DIM > update to update all the dimensions. This should remove all stacked text in Dimensions. (Revit 2009 does NOT understand stacked text yet!)
- • Edit Mtext
- • Unstack dims
- • Mtext wrap width has to be set correctly in CAD. Because of the change in TEXT style, the width could be wrong – overlapping over drawing elements.
- • All text within the mtext should have the same color. Revit creates separate text objects for each different colored texts.
- • Save
• To do in Revit:
- • Open a new project > create a drafting view in a relevant scale and import the CAD detail. Don’t import any CAD detail directly into the project file. It is just good practice!
- • Full Explode Imported CAD detail
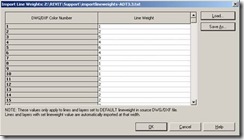
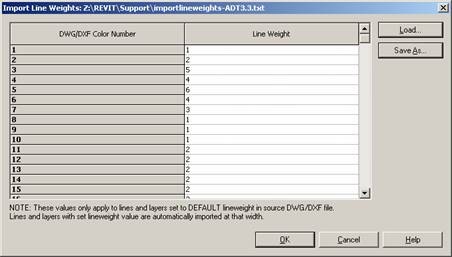
- • Line thickness should be fine, as long as, File menu > Export/Import settings > import lineweights is setup per your office standard.
- •
- • Revit creates separate linetypes for each layer in the CAD dwg. You might have to swap them to revit linetypes by selecting the objects with the filter tool. It is easy, as long as the CAD file had followed a layer standard in CAD .
- • Text style can look a bit different. You have to swap CAD text style names to Revit text styles. Again, this is easy, as long as the CAD file had followed a standard in CAD. All leaders are exploded. You have to select and delete them and create new leaders within Revit. This is painful. The new revit leaders need to point to correct objects!
- • Hatch may not be present; Typically you want to select the CAD hatches and swap it with Revit filled regions.
- • Dimensions come as exploded objects. It is better to create new ones in Revit. If line is off the axis, it is difficult to dimension in Revit.
- • None of the exploded CAD objects should have any remnants of any CAD hatch patter, text style, dwg blocks (arrow heads...!) etc.
- • Now these objects (or the drafting view) can be copied and pasted into your project.
As I said in the beginning, instead of going through all these steps, one could have easily created a full blown revit detail.
Keeping the details as CAD objects, and linking them in Revit is ok as long as
- you have both the licenses of AutoCAD and Revit
- You can live with CAD details and RVT details looking little bit different
- You are ok fighting with Revit to make it show the CAD hatches, stacked text, etc properly.


1 comment:
Great post! The importance of revitizing cannot be understated. Well explained! I work with the McGraw Hill Sweets Network, whose database of all things construction related offer a great selection of cad details.
Post a Comment